Integration with the mail allows the company to customize the most flexible options for working with letters.
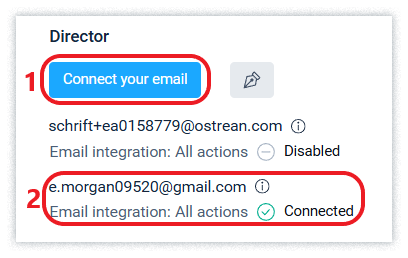
A mailbox can be obtained from the Schrift system (Schrift+ address) - one for each employee assigned to a position.
In a company where Schrift Encryption is enabled, the use of internal emails (Schrift+…@ostrean.com) is limited to ensure that company data is fully protected from access by the Schrift system services.
If the company has activated the Schrift Encryption service, all incoming and outgoing emails go through an encryption agent and thus are not stored on Schrift servers in decrypted form, even during transmission, let alone storage.
You can bind a lot of your own (external) mailboxes to the destination.
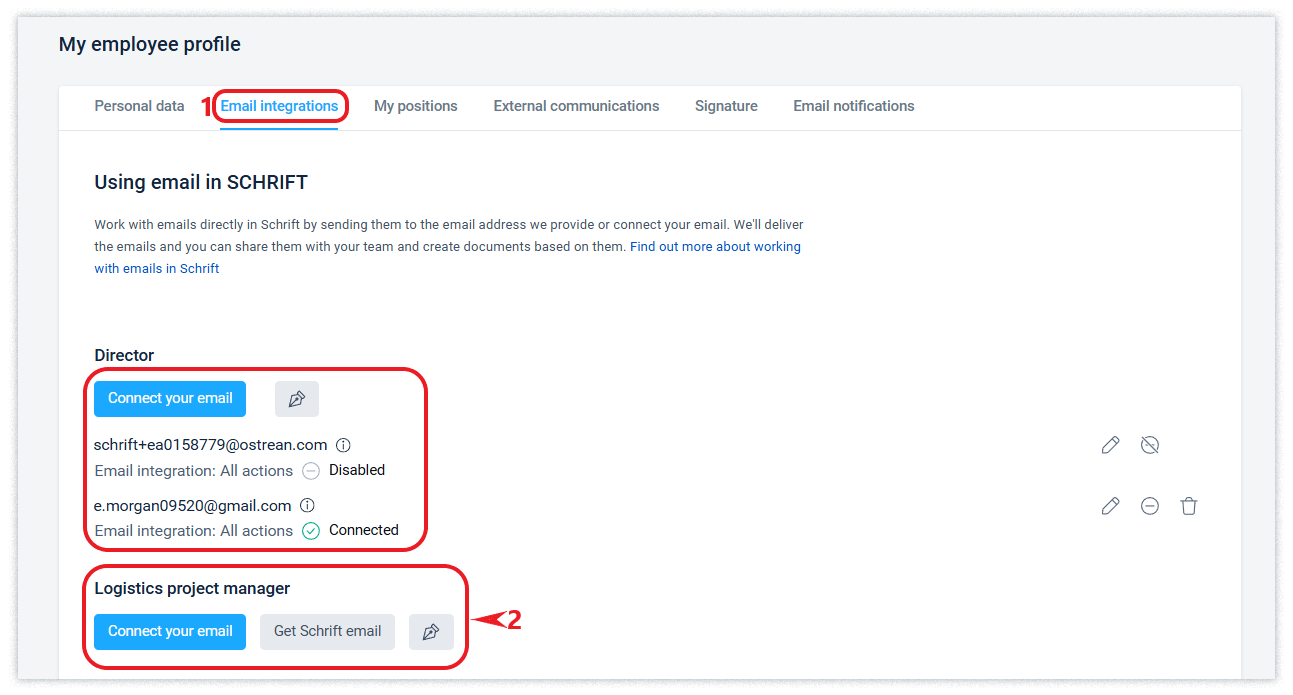
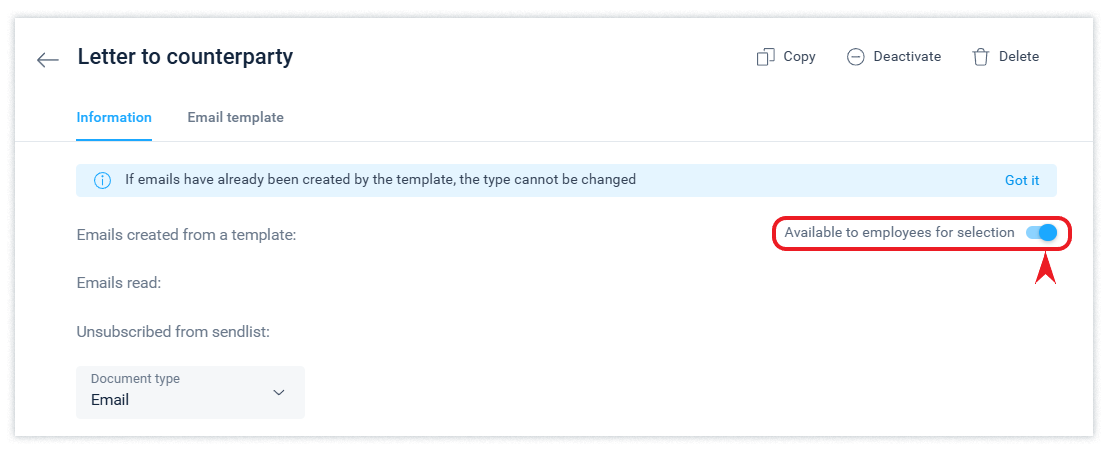
You can activate the Schrift mailbox or configure the integration in the employee profile, in the Email integration tab.
Employees can also customize signatures in emails individually for each of their positions.
Only those users who have an external communications role and an assignment: staff or duty assignment have the right to integrate mail.
The option to manage the integration of emails into the position is available to the administrator in the Company's Organizational Structure.
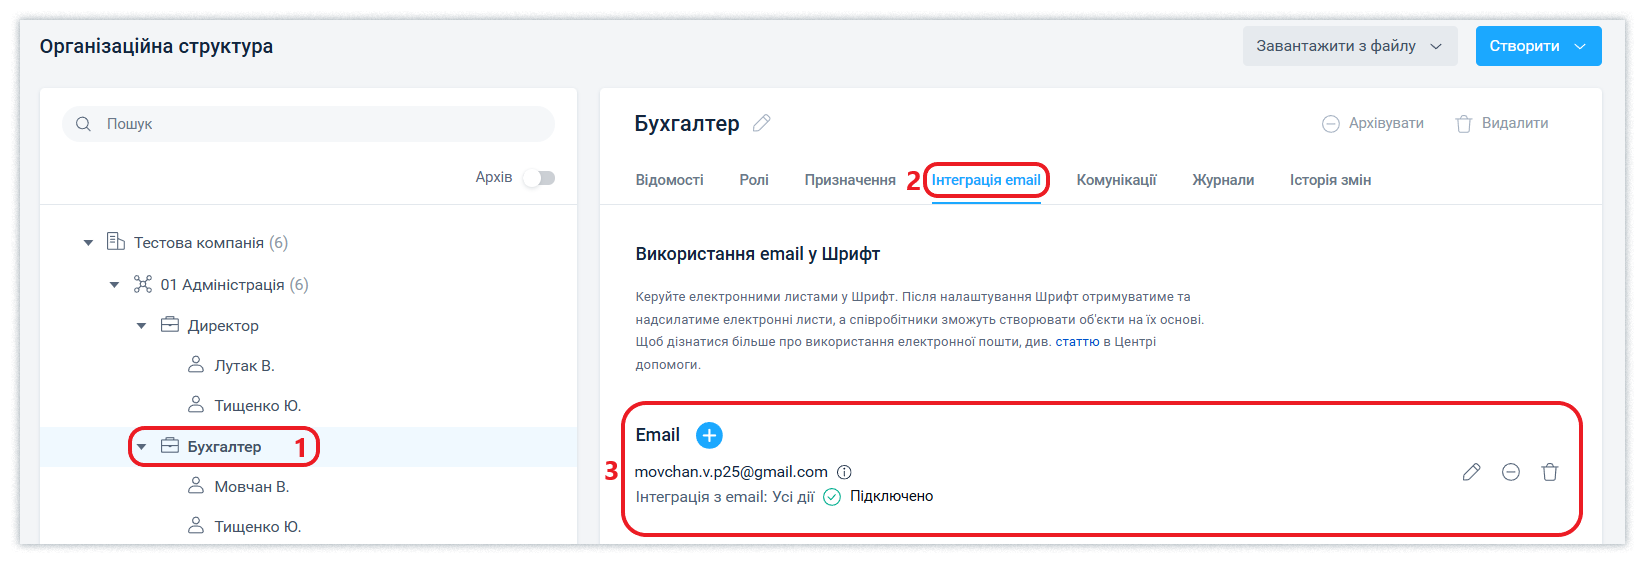
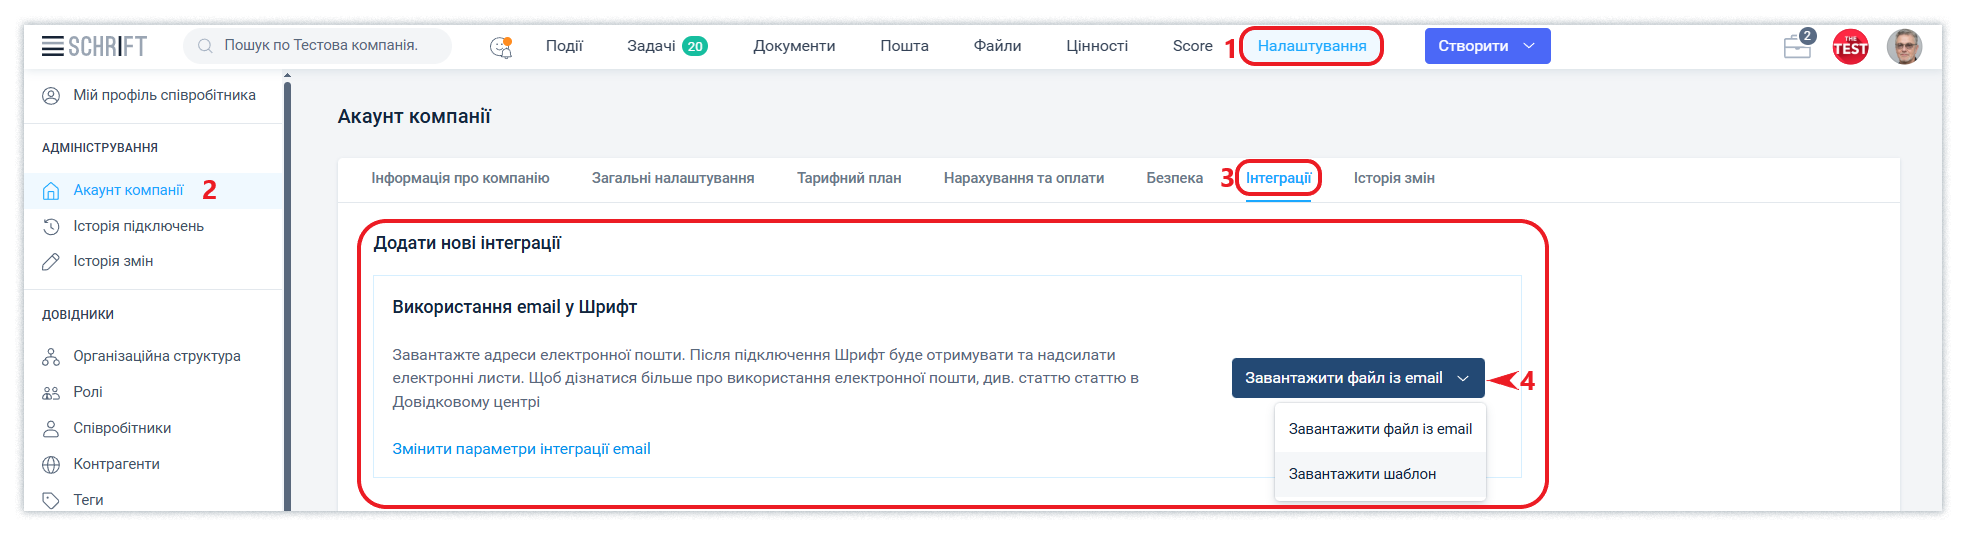
Administrators also have the option to upload emails as a list via an Excel file in the Integration tab in the Company Account.
Receiving and sending emails
You can receive and send mail after integrating at least one mailbox.
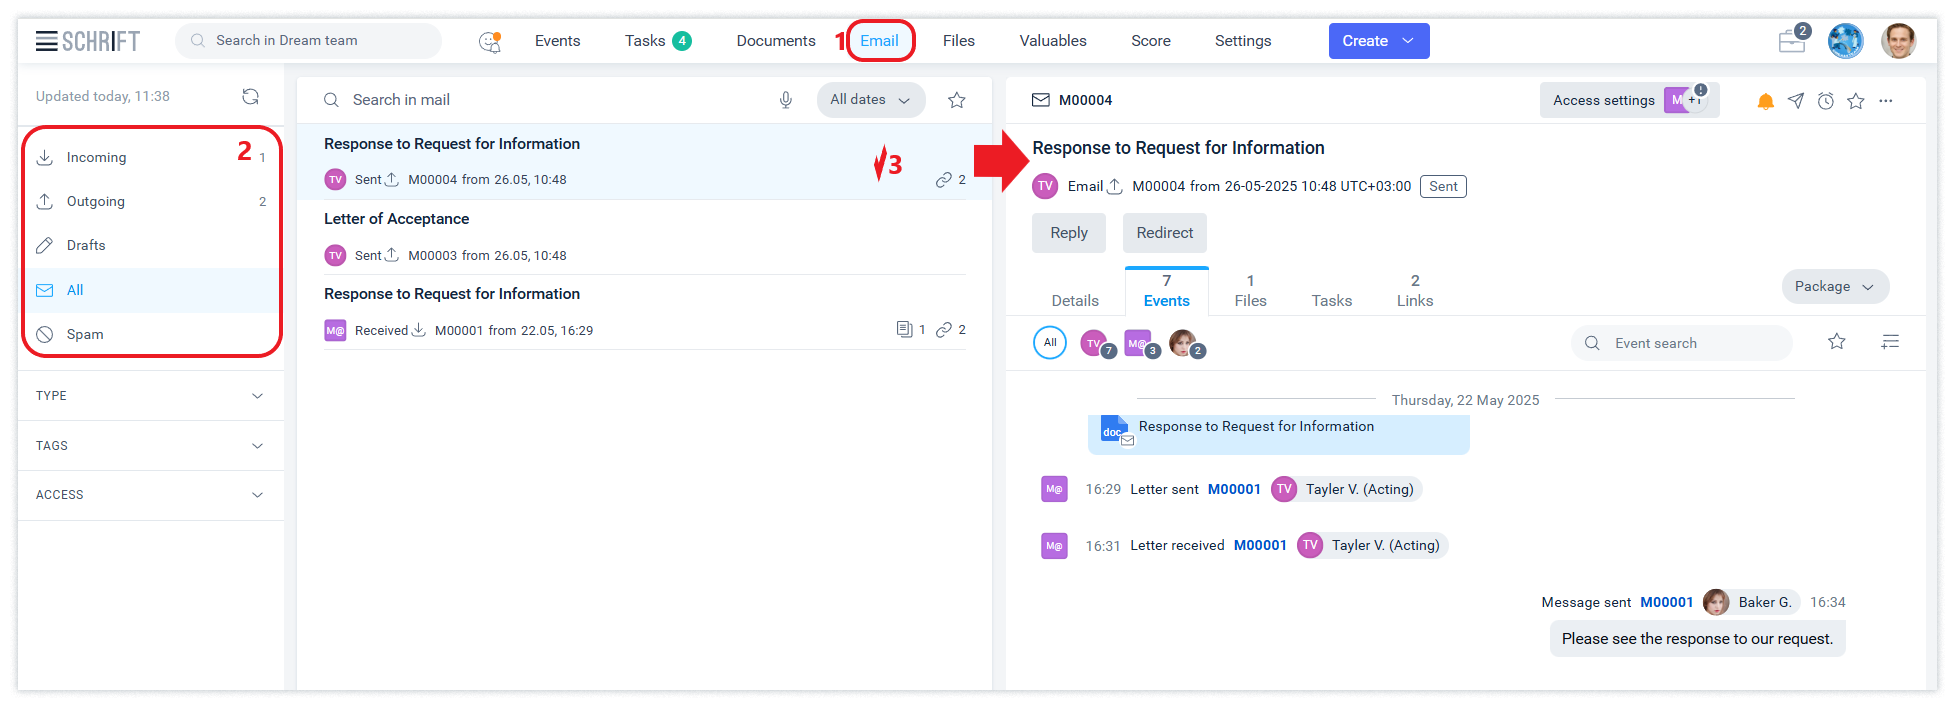
Mailboxes within the system become the same system objects as documents and tasks. You can access letters, conduct internal and external communication with them in the Schrift system.
Receiving messages
New emails are received automatically depending on the user's activity in the system: every 10 minutes if the user has been active for an hour, every hour if the user has been active no later than 12 hours ago, and every 4 hours if the user has been active for the last week.
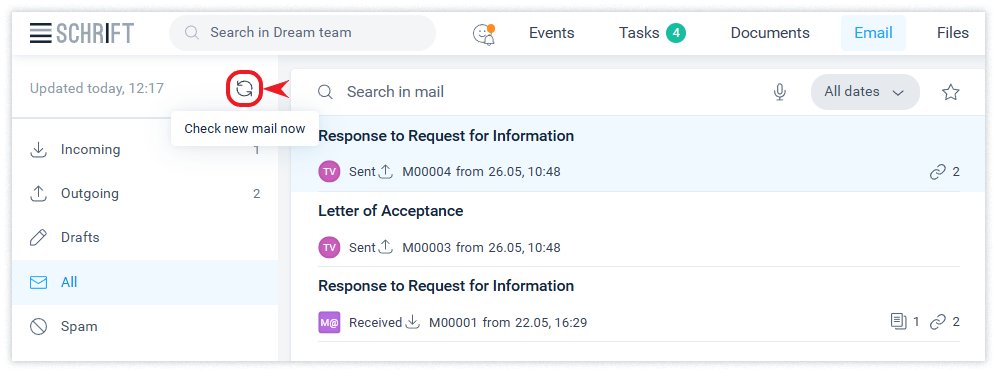
The user can check new mail at any time by clicking the “Check new mail now” icon.
Messages that were placed in the Spam folder by your mail server will not be imported into the system. To avoid losing important emails, you should periodically check it and adjust the settings.
Sending emails
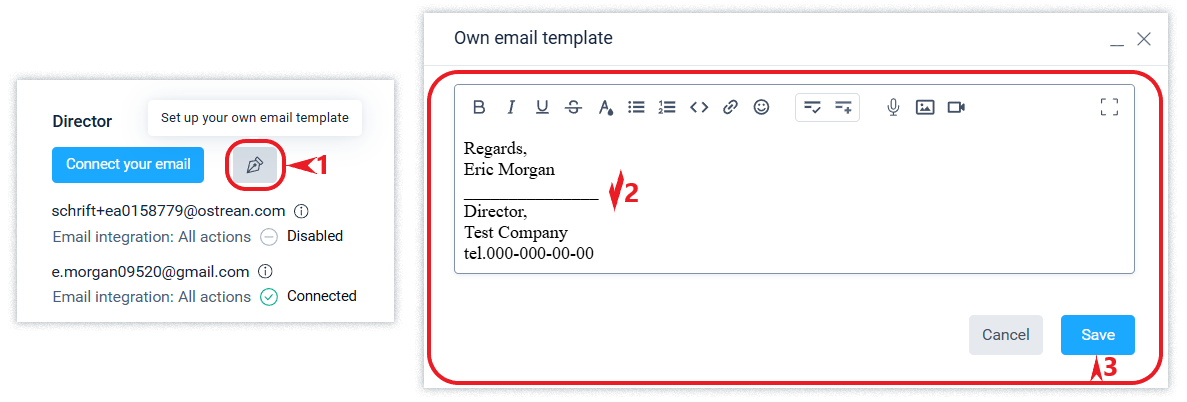
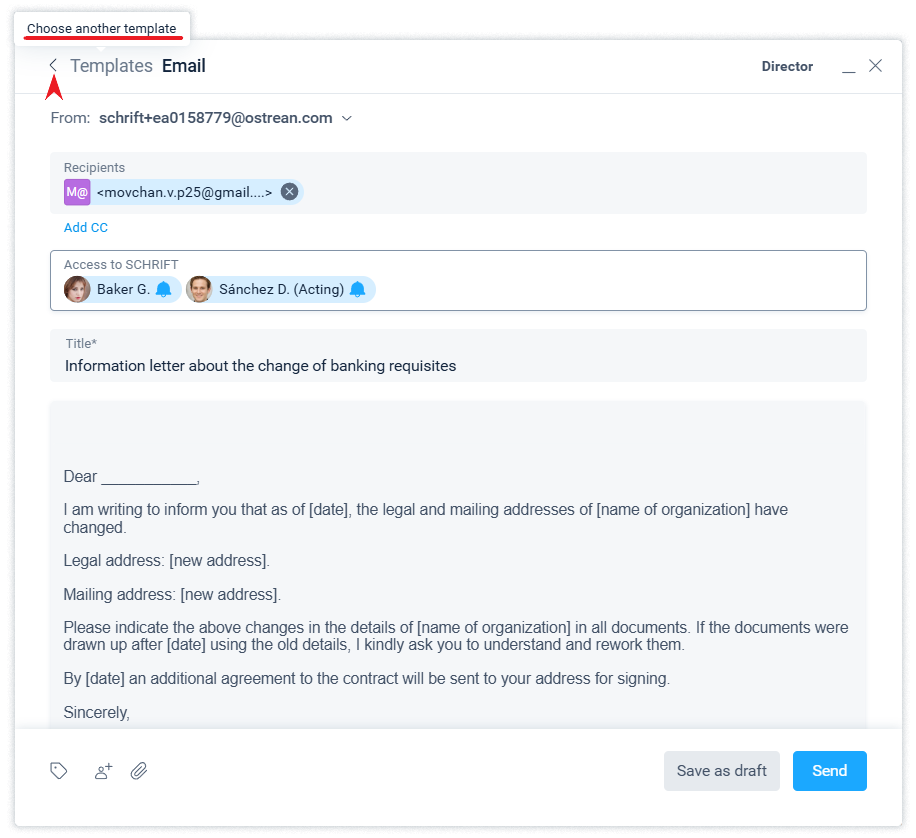
To send emails, you use templates, just like documents. Therefore, if you want to simplify the creation of an email, for example, by adding the first line of a salutation and lines at the bottom of the email (signature, etc.), as well as different languages, you can do all this by setting up the appropriate number of templates.
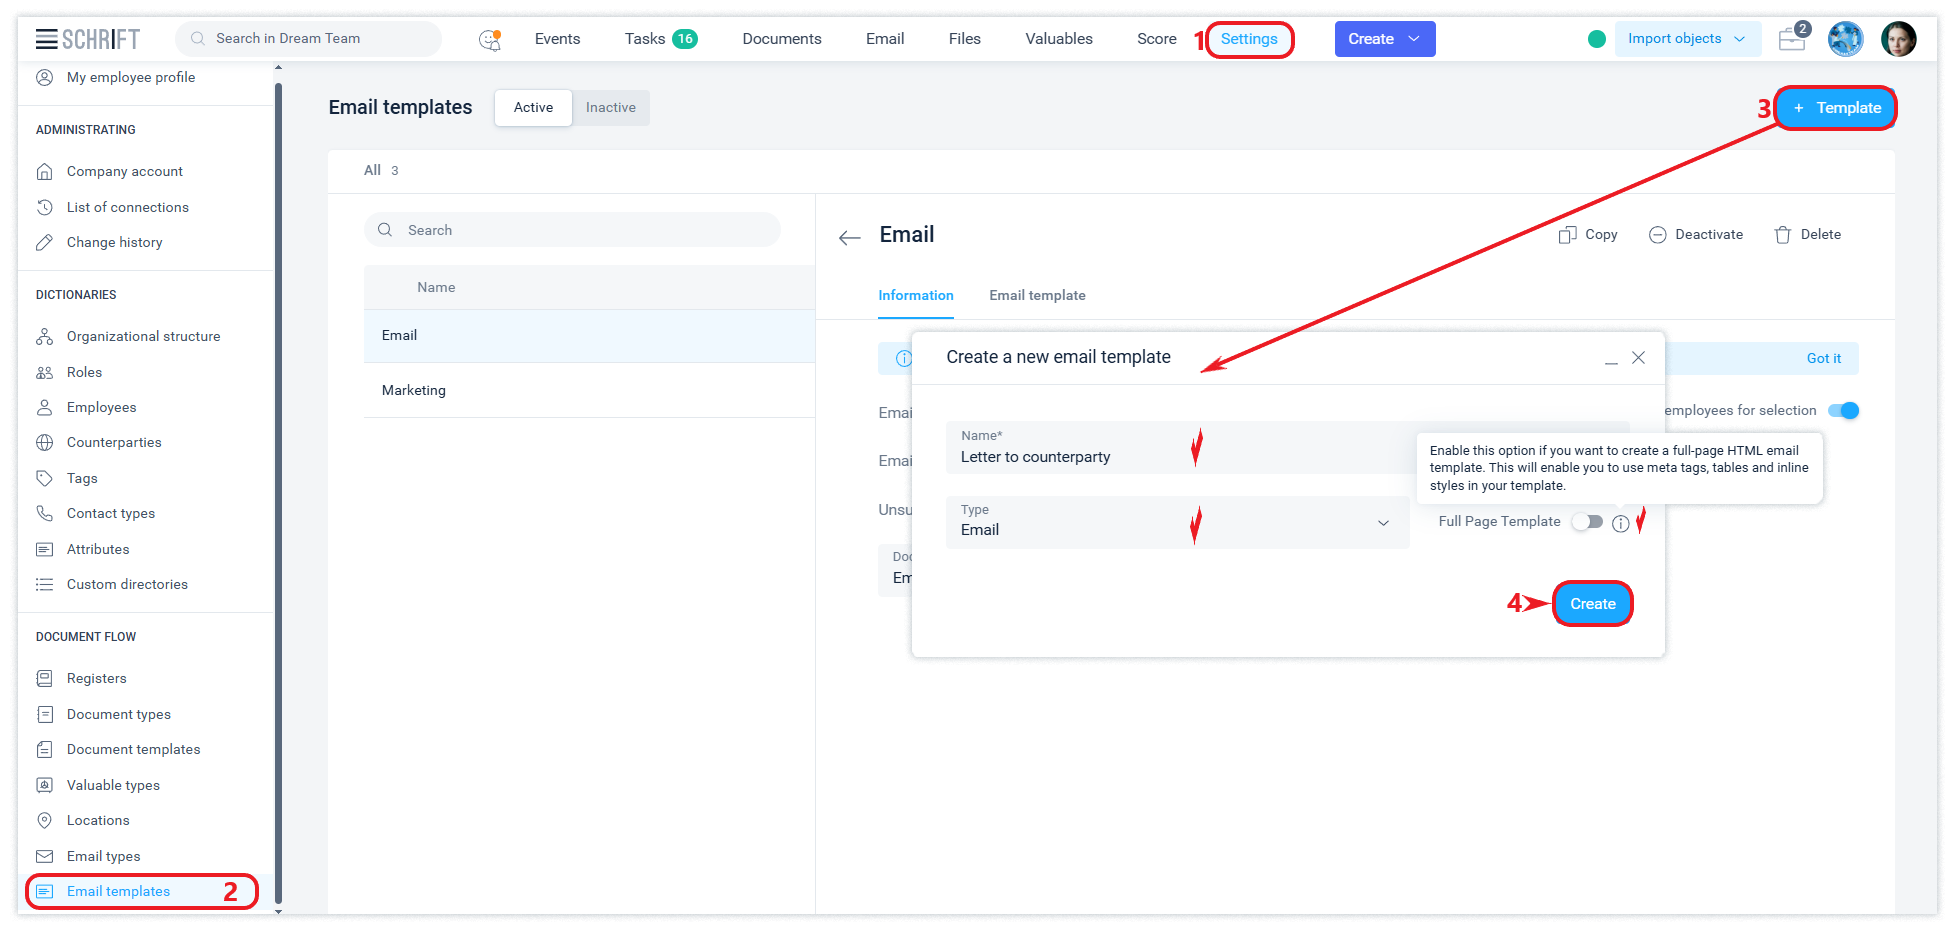
After creating and customizing an email template, share it with your employees.
To set up automatic substitution of an employee's first and last name when creating a letter, add the line <employee name_int> at the bottom of the template text to substitute the usual first and last name, and <employee name_ext> to substitute the international first and last name, if specified in the employee's data.
<employee position_name> - job title
<employee org_address> - organization address from the organization's contact details
<employee org_employee_phones> - phone number from the organization's contact details and phone number from the employee's contact details.
In the form of creating an email, there is a transition to re-selecting templates. The logic of mandatory fields when creating an email corresponds to any email service.
If all entities (emails) in the email recipients are used in the company's data (are integrated, are employee logins, or are specified in employee contact details), then such an email will be processed within the Schrfit system and will not pass through the sender's mail server.
The system provides information about the reading of emails sent from the system by each recipient.

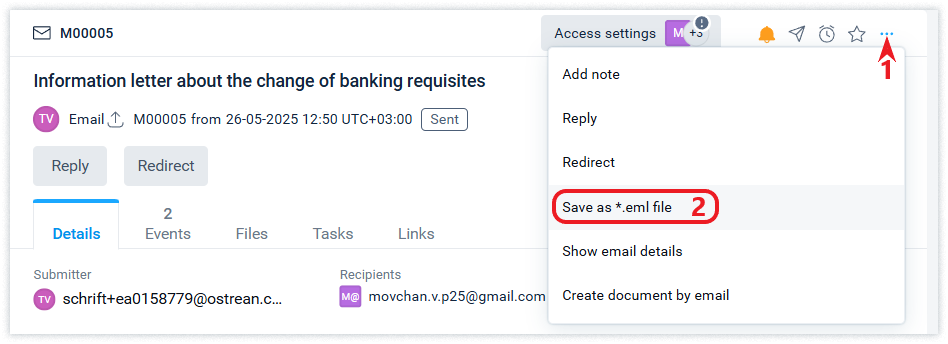
Saving an email as an eml file
Any email sent or received can be downloaded in eml format. This is a universal email file format that in many cases, including legal audits, has comprehensive information about the email and the necessary proof of all its attributes.
Create a document by email
You can create a document based on an email. The data from the email will be included in the created document in addition to other attributes inherited from the selected document template.

You can interrupt the creation of an email by saving it in the Draft status to send it later, when it is ready.
The Mail section of the interface
The Mail section has the same structure as the other sections: a filter panel on the left, a thread of messages in the center, and detailed information about the message that is currently in focus in the center thread on the right.
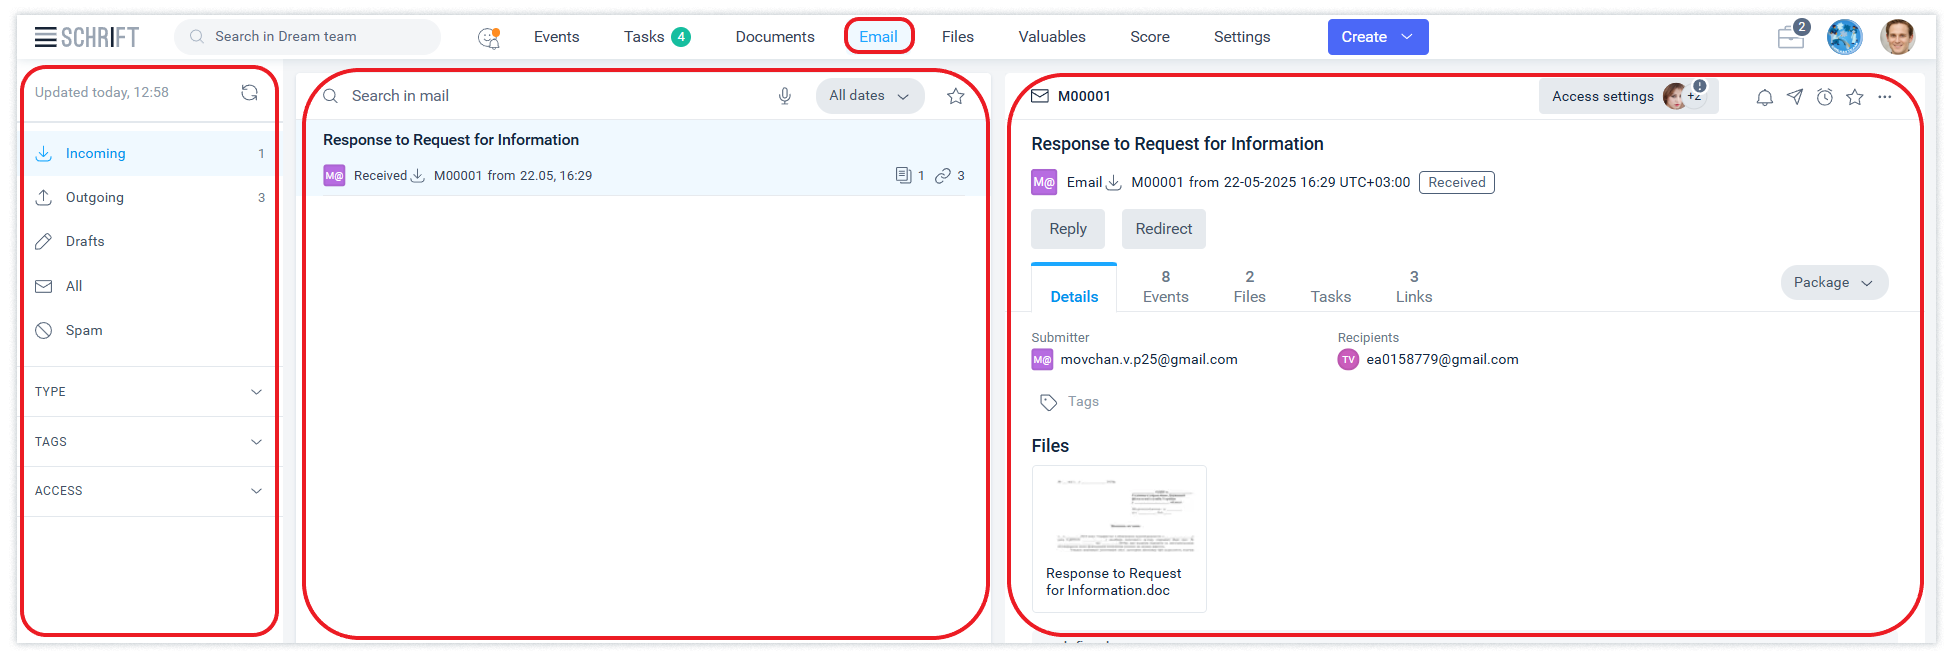
In the filters panel, you can filter emails by incoming, outgoing, all, drafts, and spam.
The sender of the email receives information about the reading of the email by each of its recipients. This information is contained in the details of the mail sending event.
A user may need to manually link an e-mail to another e-mail or to any other object of the system. This is relevant for cases when the mail server has not linked emails into one common email chain for various reasons.
Using a spam filter
The system gives you the opportunity to get rid of annoying emails. Simply include the sender's address, the whole domain or any part of the domain name in the spam filter.
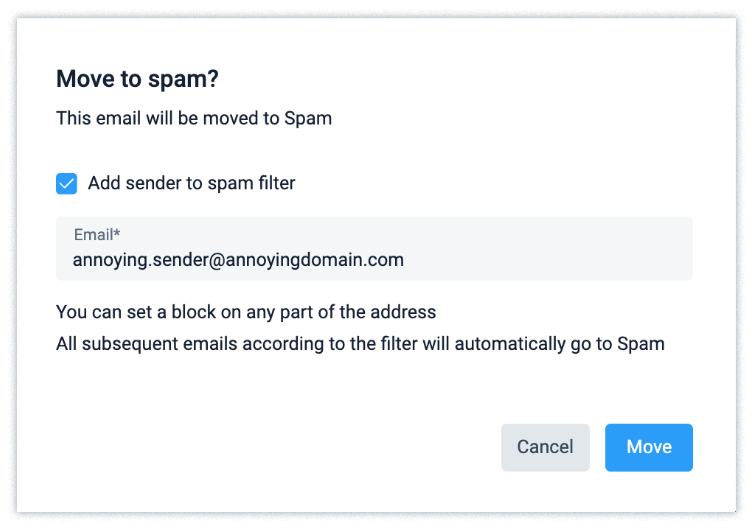
You will be pleasantly surprised by the convenience and quality of the spam filter.
The spam filter is shared across the company. This means that every user contributes to its configuration, and all company employees benefit from the filter's performance.
Emails are automatically deleted from the spam folder 30 days after they are placed there.
Spam filter settings
When you hover over the name of the Spam filter, an icon appears to open the spam filter settings. In the window that opens, you can add and delete criteria for filtering mail so that it does not automatically end up in spam and does not distract the user.
All changes to the spam filter settings (who made them and when) can be viewed in the Change History tab.
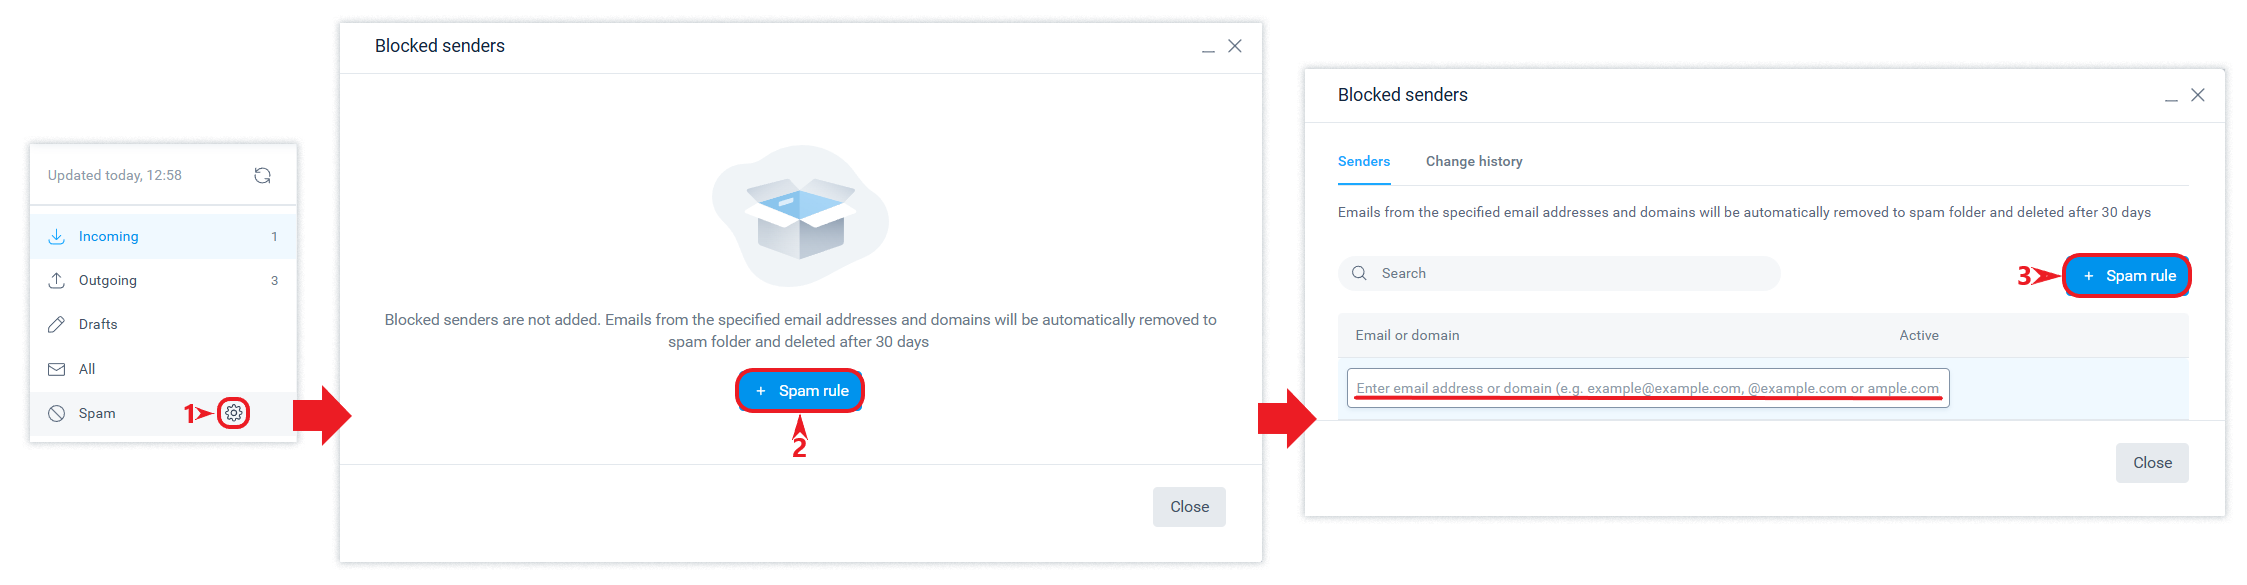
You can filter by the sender's address or any part of it, including the domain name. In the Search field of this form, you can instantly select results by entering a single character or more.
Spam Score threshold settings
In the mail integration section (company account), you can independently set the filter's ‘sensitivity’ level (Spam Score). Emails with a score higher than the set threshold will be automatically moved to the ‘Spam’ folder within the system.
The default setting is level 6. This is the optimal balance, which filters out most unwanted messages without blocking important business correspondence.
For the system to work correctly, we strongly recommend that you disable the automatic spam transfer function on your external mail server. And entrust Schrift to do this job.
Why is this important? If the mail server automatically moves emails to its internal Spam folder, they will become unavailable for processing by the Schrift system. This will prevent users from finding such emails in the Spam folder (in Schrift) themselves and ensure that no important messages are lost due to overly aggressive external filters.
Intelligent mapping (granting access)
This section explains how the system understands which employees to grant access to a letter when it sees an email in the list of recipients. The system uses a three-level priority system:
Priority principle: The system checks the levels in turn. If a match is found at a higher level, the lower levels are not checked.
-
First level (Integration): Direct match ‘This email has integration with the position.’ This is the highest priority, which guarantees access to a specific official.
-
Second level (Staff appointment): Match based on the login of the employee who is permanently appointed to the relevant position.
-
Third level (Performance of duties): Match based on the login of the employee who is currently acting in this position.
If the recipients of an outgoing email include an email address from an employee's contact details, that email is considered to belong to that employee's position and becomes accessible to them.
Connecting external mailboxes
The user can choose which integration format he needs: only receiving mail, only sending it from Schrift, or both.
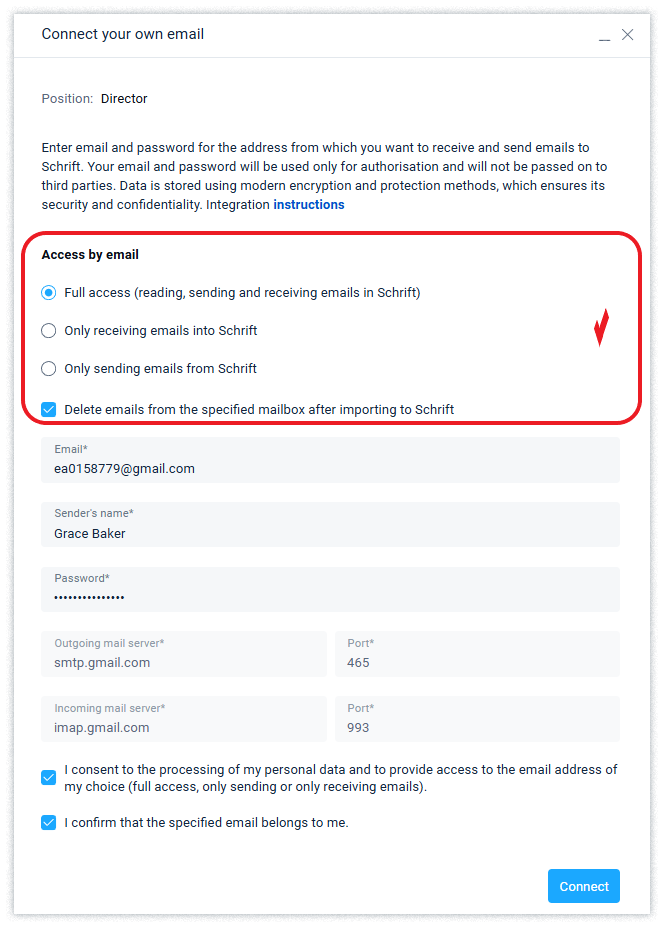
If you don't want to duplicate emails in two places: in Schrift and in your mailbox, you can enable the “Delete emails from mailbox after importing to Schrift” option.
The sender's name is filled in automatically, but you can edit it or enter a different name manually.
Connecting external mailboxes is a simple process, but it can cause some difficulties for users. Do not hesitate to contact our technical support if you encounter any difficulties with the connection.
Public email services, such as Gmail and others, usually do not allow you to use your email account password to authorize third-party applications to your account.
Technical features of working with mail
-
Internal communication without a mail server: If all participants in the correspondence (the sender and all recipients) are employees of your company, such letters do not physically pass through an external mail server. Information is exchanged instantly within the database, which guarantees maximum speed and eliminates the possibility of data interception from outside.
-
Connection protocols: The system works exclusively with the IMAP protocol. Support for the outdated POP3 protocol is not available.
Gmail
You need to get a separate password for integrations in the settings of your Google account, in the "Application passwords" section. To find the "Application passwords" section, enter the word "passwords" in the "Search" field and select this section in the drop-down list.
Please note that the Application passwords section is available only if two-step authentication is enabled (Google Account Security section).
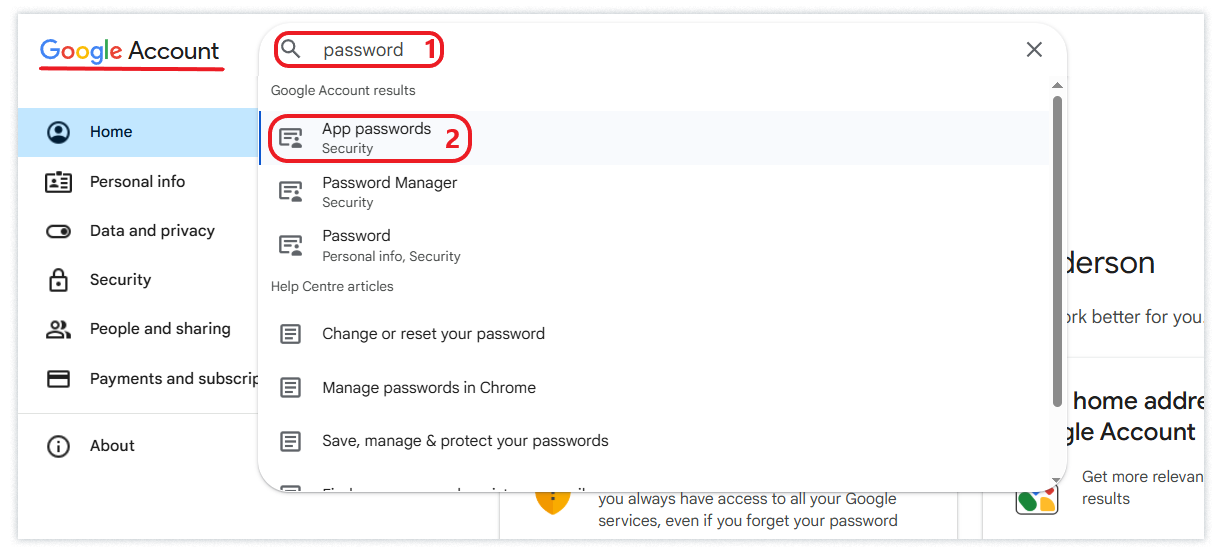
After creating a password, it will be displayed once. You need to copy it to the clipboard (Ctrl+C) and paste it into the Password field of the Email integration form in the Schrift (Ctrl+V).
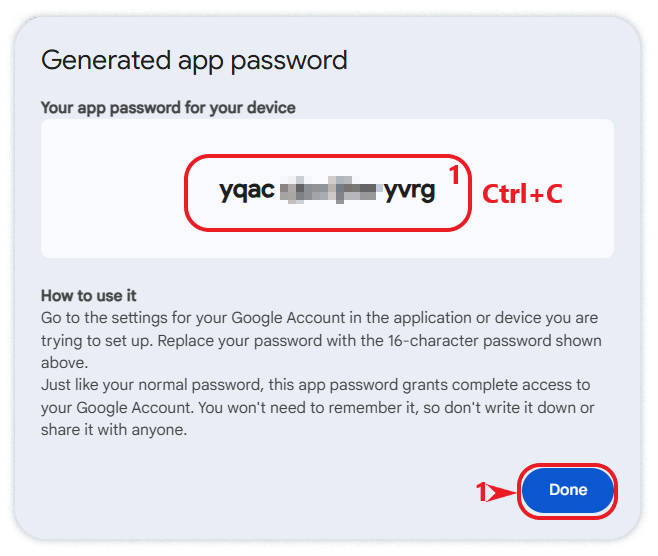
The application password can be deleted at any time in your Google account, thus depriving the third-party application (in our case, Schrift) of access to your mailbox.
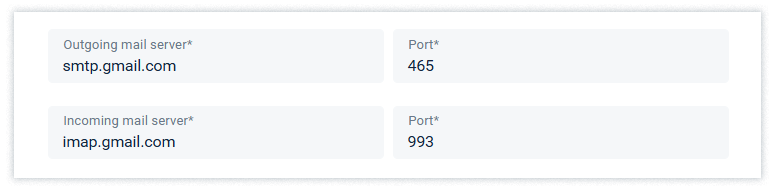
In the fields of the mail server of incoming and outgoing mail, as well as the ports used, you can use the values suggested by the Default Schrift. They are applicable specifically for Gmail integration.
Other mail servers
To properly configure integration with other mail servers, refer to their documentation or contact the administrators of the respective servers.